Spectra Pump Parts: A User Guide
Note that this post is not sponsored by Spectra or any other entity; the opinions shared here are my own. This post may have affiliate links, which means I may receive commissions if you choose to purchase through links I provide (at no extra cost to you). As an Amazon Associate, I earn from qualifying purchases. Read more about these links in my disclosure policy.
In this article, we will cover everything you need to know about Spectra breast pump parts. We’ll cover the names and function of the Spectra breast pump parts, and the recommended replacement frequency for Spectra breast pump parts depending on whether you’re exclusively pumping or pumping part of the time. I will share some of my top tips, what I would have wanted to know before purchasing my first breast pump, and my own personal experience with Spectra pump parts as a 7+ year user of Spectra breast pumps. The information in this article applies to pump parts that are used with the Spectra S1 Plus and Spectra S2 Plus breast pumps.
Spectra S2 Plus along with Spectra pump parts
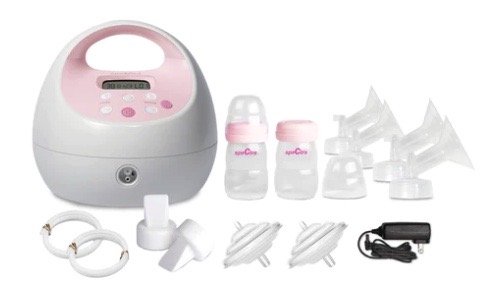
spectra pump parts: what’s in the box?
Here are the pump parts that will come in the box with your Spectra breast pump:
Milk Bottles (2)
Duckbill Valves (2)
28mm and 24mm Breast Flange (2 of each size)
Backflow Protector Assembly (3 separate parts per side, 6 parts total)
Tubing (2)
Power charger (1)

Image of Spectra breast pump parts and how they fit together.
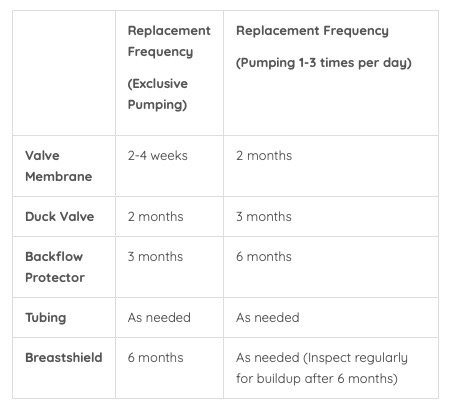
spectra pump parts: recommended replacement frequency
Eventually, your Spectra breast pump parts might need replacement, or your may want to purchase extras to have on hand. You can easily order Spectra replacement pump parts online from Amazon or from the Spectra website directly. Here are the most commonly replaced Spectra pump parts:
Here is the recommended frequency for replacing pump parts directly from Spectra’s website.
spectra pump parts: real life perspective
I’ve used my Spectra breast pump for nearly 8 years now, so needless to say, I’ve had a lot of experience with Spectra pump parts. If I were shopping for my first breast pump all over again, or if I had just purchased a Spectra pump and wanted to know what to expect, here are the things I would want to know about the Spectra pump parts:
Are Spectra pump parts ACTUALLY dishwasher safe?
YES! I don’t even know what the Spectra website says about this to be honest, but I’ve absolutely washed my Spectra pump parts daily in the dishwasher for YEARS without issues. This is a big deal to me—as a mom of now four kids, I prioritize convenience over a lot of things, and being able to pop these in the dishwasher each night and have them clean and sanitized the next morning is a lifesaver. I’ve not had damage or warping to any of the parts from the dishwasher. The tubing, of course, cannot be put in the dishwasher, but I routinely (read: daily) put all of the other Spectra pump parts in the dishwasher. If you want more guidance on exactly how to clean your Spectra pump parts, be sure to check out our full article here.
How often did you REALLY replace Spectra pump parts?
Alright, time for some complete honesty—I don’t replace my Spectra pump parts nearly as frequently as the recommendations from their website that I shared above. Why? Because this pump, and its parts, work great and last a long time. I replaced my parts each time I had a new baby, and then once or twice ad-hoc when I broke parts (a few times over the years I dropped my pump parts with milk right after pumping, and it caused the very end of the valve protector assembly to snap off inside of where it connects to the flange).
How do you store your Spectra pump parts between pumping sessions?
As a mom who has always worked full time while my babies are in daycare starting between ages 12 - 16 weeks, I spent literally years pumping during the workday. I always store my Spectra pump parts in a gallon-sized ziplock bag in the fridge between pumping sessions. Once I’m finished with a pumping session, I empty my milk into freezer bags or whatever storage container I’m using that day. Then I screw the Spectra milk bottle back onto the flange and put everything into a clean ziplock bag (use a fresh one each day) and in the fridge. When it’s time to pump next, I simply remove the two breast pump part assemblies from the ziplock bag, attach the tubing to the end of the valve assembly, and you’re ready to go! As I mentioned above, I then wash the pump parts in the dishwasher at the end of each day.
What tips do you have for assembling the Spectra pump parts?
Here is the order in which I assemble the pump parts:
1. Attach middle part of valve assembly (the soft rubbery part) to the plastic part of the valve assembly that attaches to the flange (left in the image above).
2. Attach the tubing side of the valve assembly to the rubber part of the valve assembly (right in image above), so that your valve assembly is completed
3. Next, attach the completed valve assembly to the flange
4. Attach the duckbill valve to the underside of the flange
5. Screw the milk bottle onto the flange
6. Attach the tubing to its connection point on the valve assembly
7. Connect other side of tubing to Spectra breast pump
Now that you know all about Spectra pump parts, you’re ready to begin or continue your pumping journey with your Spectra pump. If you’re looking for more information on how the pump settings on the Spectra pumps work and how to optimize them to maximize milk production and your comfort, how to clean your Spectra pump parts, or for a full review of the Spectra S2 pumps, be sure to check out the other articles here on Mom’s First Steps. Happy pumping!